How to declutter your home one room at a time without burning out
To declutter your home one room at a time is to stop treating your entire house like an emergency and start treating it like a series of manageable spaces. If you’ve ever read advice telling you to clear everything in a weekend, then stared at your kitchen counter, bathroom shelf, and bedroom floor and felt instantly tired, I get it. I couldn’t do it all at once either. What finally worked for me was slower room by room decluttering with a clear end point, a timer, and a plan for where unwanted items would go besides the trash.
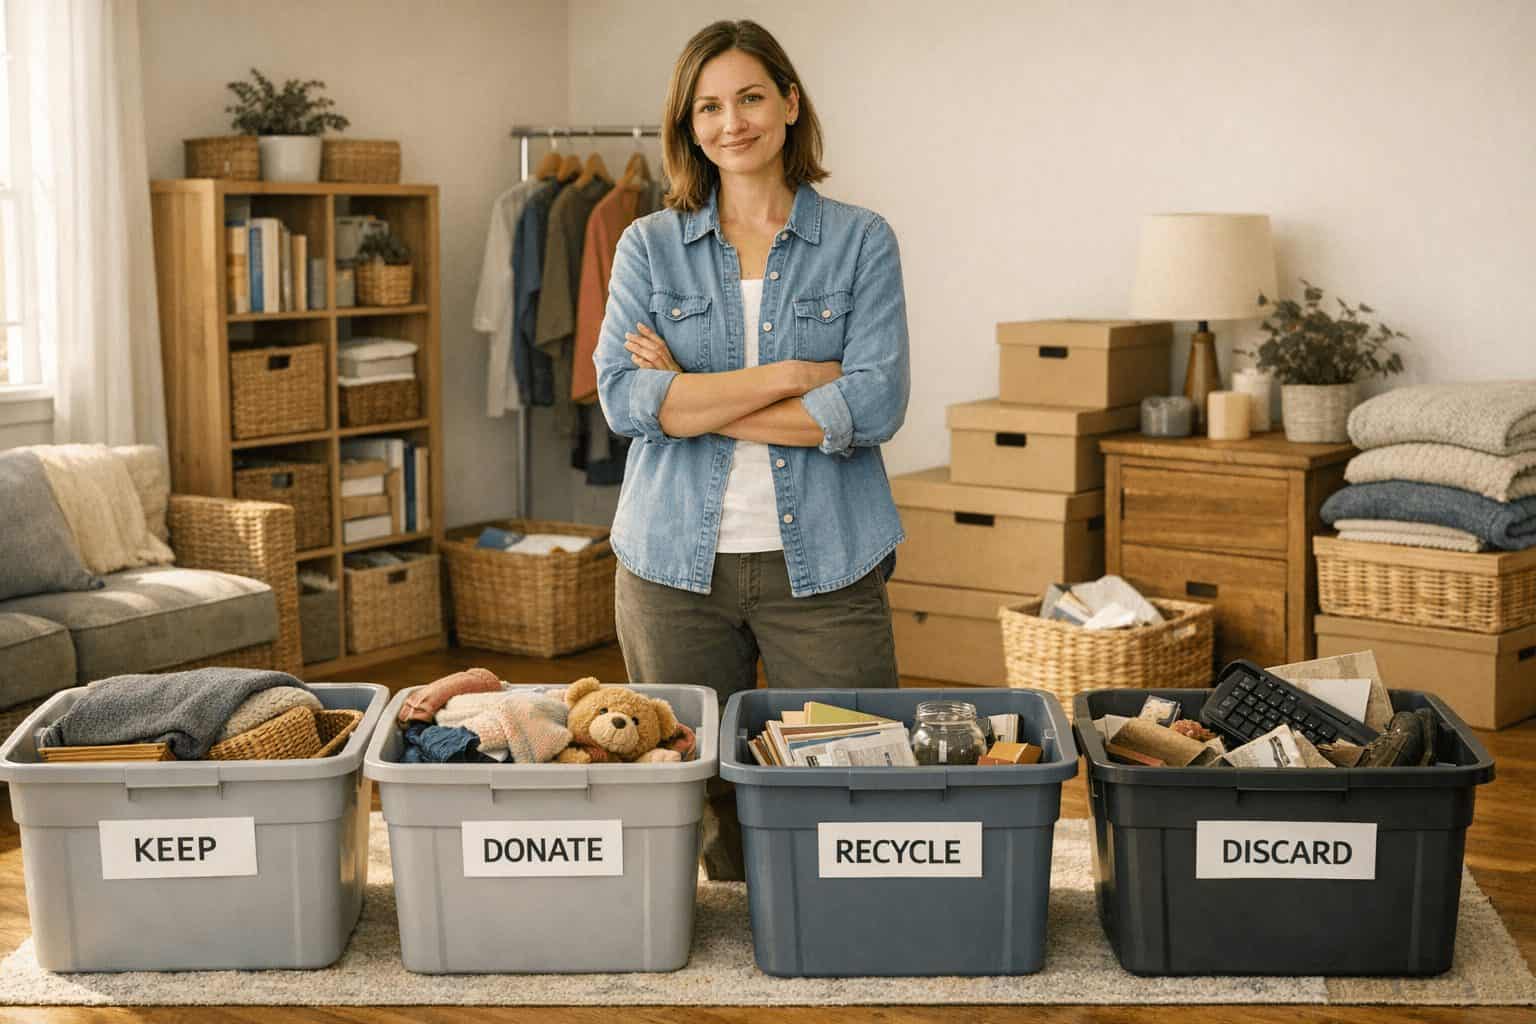
This approach is practical for busy homes because it lowers pressure, limits decision fatigue, and makes sustainable choices more realistic. Instead of filling black bags in a panic, you sort thoughtfully: keep, donate, recycle, discard. You do one contained area at a time, usually in 30 to 90 minutes, then stop. That’s the method in plain terms, and it works even if life is noisy, your schedule is packed, and the house is nowhere near photo-ready.
Quick Summary
- Start with one small room or one clearly defined zone, not the whole house.
- Use four categories: keep, donate, recycle, discard.
- Set a timer for 45 minutes and stop, even mid-task, to avoid burnout.
- Begin with the bathroom for a quick win, then move to bedroom, kitchen, living room, and storage.
- For low-waste results, check EPA disposal guidance and your local recycling options before tossing hard-to-handle items.
 1")
A simple way to start when you feel stuck
You do not need a perfect master plan to begin. You need one room, one timer, and a place to put outgoing items. If you’re asking how to declutter each room, the answer is surprisingly consistent: pick a contained area, empty only what you can finish, decide what earns its place, then reset the space before you leave it.
I’ve found that 45 minutes is the sweet spot. Long enough to make visible progress, short enough that you don’t end up sitting on the floor surrounded by half-sorted piles at 9:30 p.m. If 45 feels too long, do 20. If you have more energy, stretch to 60 or 90. But stop on purpose. That stopping point matters because it turns decluttering into a repeatable routine instead of a dramatic event.
Use this starting rule: choose the room that gives you either the fastest win or the biggest daily relief. For many people, that’s the bathroom because expired products are easy decisions. For others, it’s the bedroom because visual clutter there follows you into sleep and back into the morning.
Why this slower method works better for real households
The biggest strength of how to organize your home room by room is that it reduces decision fatigue. Every object asks a question: Do I use this? Need this? Love this? Can someone else use it? Multiply that by hundreds of items and your brain starts dodging the work. Limiting the project to one room keeps the number of decisions low enough to finish.
It also creates visible progress. A cleared bathroom drawer or calmer nightstand gives you proof that the process works. That matters more than people admit. I’ve had decluttering attempts stall because the effort was huge but the result felt invisible. One finished room changes that. You can see it, clean it, and maintain it.
There’s also a sustainability benefit. A slower pace gives you time to check donation guidelines, find textile recycling, or set aside batteries and electronics for proper drop-off. The EPA’s materials management guidance prioritizes reducing waste and handling materials more responsibly, which fits this method far better than a speed purge. It is slower, yes. That’s the trade-off. But slower often means fewer regrets and less waste.
What room-by-room decluttering looks like in real life
Timelines vary a lot. A studio apartment with one adult and minimal storage is different from a three-bedroom home with kids, pets, and a garage full of delayed decisions. Use the table below as a planning guide, not a promise.
| Room | Time Estimate | Common Clutter | Disposal Options | Difficulty |
|---|---|---|---|---|
| Bathroom | 30–60 min | Expired products, duplicates, samples | Trash, local recycling, take-back where available | Low |
| Bedroom | 45–90 min | Clothes overflow, bedside clutter, linens | Donate, textile recycling, trash | Medium |
| Kitchen | 60–120 min | Duplicates, gadgets, food containers | Donate, recycle, e-waste for appliances | High |
| Living room | 45–90 min | Paper piles, cords, hobby spillover | Recycle, donate, e-waste | Medium |
| Closets | 60–120 min | Clothing, shoes, bags, “someday” items | Donate, consign, textile recycling | High |
| Storage areas | 90 min to several sessions | Seasonal items, boxes, old electronics | Donation, municipal drop-off, e-waste | High |
For disposal rules, check your city or county website first. Recycling rules are local, especially for aerosols, medicines, paint, batteries, and small appliances. If you need a broad starting point, Earth911 can help locate recycling options, but your local government guidance should win when there’s a conflict. The local rules are more specific than any national database, so the city site is where the real answers live.
How to declutter your home one room at a time, in the right order
My preferred order is bathroom, bedroom, kitchen, living room, then closets and storage. That sequence builds confidence before you hit the rooms with the most emotional and logistical drag.
Start with the bathroom for a quick win
Bathrooms are usually small, and the decisions are often obvious. Toss expired sunscreen, dried-up mascara, hotel minis you never touch, and duplicate products you forgot you had. Open drawers and cabinets one at a time. If something smells off, leaks, or has separated into weird layers, that’s your answer. Keep only what you use weekly, plus a small backup of essentials.
Move to the bedroom and apply the function-plus-frequency rule
If you’re unsure what to keep when decluttering, use this rule: keep items that serve a real function and are used with reasonable frequency. A winter coat has low frequency but high function. Six nearly identical black T-shirts you don’t wear are different. In my own bedroom, the biggest issue wasn’t dramatic clutter. It was the slow creep of “I’ll deal with this later” clothes on a chair, old chargers in a drawer, and linens I kept because they were still technically usable.
Tackle the kitchen carefully
The kitchen can get frustrating fast. You’ll find duplicate peelers, warped containers without lids, novelty gadgets used once, and mugs multiplying somehow. Pull out one cabinet or one drawer at a time. Keep the tools you use monthly or more, plus a few special-use items you genuinely rely on. Donate decent duplicates. Recycle what your area accepts. For broken small appliances, check local e-waste guidance.
Clear the living room of temporary clutter that became permanent
This room tends to collect wandering objects: mail, kids’ items, hobby gear, blankets, remote controls, cables, random receipts. The mistake I made for months was moving clutter from room to room instead of removing it. A basket from the living room went to the bedroom, then to the hallway, then back again. It looked like action, but it was just relocation. If an item belongs elsewhere, put it away immediately. If it has no home, decide now.
Leave closets and storage until you have momentum
Closets and storage areas hold postponed decisions. They’re where guilt lives: old sizes, abandoned hobbies, mystery cords, spare decor, unopened boxes. Save these spaces for later, when your decision muscle is stronger. If clothes are in good condition, donate them. If they’re stained or too worn, look for textile recycling. For general guidance and professional organizing standards, the National Association of Productivity & Organizing Professionals is a useful reference point.
 2")
Practical tips that prevent the usual crash
Two common mistakes show up again and again. First, marathon sessions. They feel productive until you hit the wall and leave piles everywhere. Second, starting with sentimental items. Old letters, baby clothes, inherited dishes, and memory boxes can stop a session cold. Leave those for later, when you’ve already built confidence in easier rooms.
There are also costs. Not huge ones, but real ones. A set of reusable bins might cost $20 to $50. A car trip to a donation center costs fuel and time. Some municipal facilities charge small fees for mattresses, paint, or electronics. If you need help hauling large items, junk removal can run from $80 to several hundred dollars, which is why a slower, lower-volume approach often saves money.
Shared households add friction. If you live with a partner, roommate, or kids, don’t silently declutter their things. That creates conflict fast. Instead, clear shared surfaces, define zones, and ask for decisions on a short deadline. I’ve had the “I’m not getting rid of that” conversation enough times to know that cooperation beats surprise every time.
How this compares with faster decluttering methods
Not every method fits every household. Here’s the honest trade-off.
| Method | Best For | Pros | Cons |
|---|---|---|---|
| Room-by-room | Busy households, overwhelmed beginners | Manageable, visible progress, easier to sustain | Slower overall, can ignore cross-room categories |
| Whole-house blitz | People with time, help, and low emotional clutter | Fast transformation, fewer repeated setups | High burnout risk, more waste, chaos if unfinished |
| Category-based | People who want consistency across the home | Good for clothes, books, papers, toys | Can create huge piles and emotional overload |
This is ideal for: busy homeowners, renters, parents, and anyone who gets overwhelmed by large projects. You might want to adapt it if emotional attachment is the main issue, if you live in a highly shared space, or if clutter is severe enough to affect safety. Hoarding-level clutter needs a more specialized and supportive approach than a standard article can provide.
If your priority is eco-friendly decluttering, room-by-room is usually the better fit. If your priority is speed above all else, a blitz may clear space faster, but it often sends more usable items to the landfill.
A repeatable checklist you can use every week
If you want a decluttering checklist by room, use this exact sequence. Keep a donation box permanently somewhere accessible. Mine lives in a hall closet, and that one small setup change made future sessions much easier.
| Step | What to Do | Example by Room |
|---|---|---|
| Pick one space | Define the endpoint before you start | Bathroom sink drawer, not entire bathroom |
| Set a timer | Choose 30, 45, 60, or 90 minutes | 45 minutes after dinner on Tuesday |
| Sort into 4 categories | Keep, donate, recycle, discard | Expired lotion = discard, extra towels = donate |
| Remove outgoing items | Take them out of the room immediately | Donation box to trunk, recycling to bin |
| Clean and reset | Wipe surfaces and return only what belongs | Kitchen drawer liners, folded towels, clear counter |
| Schedule the next session | Attach it to a real day and time | Saturday 10:00 a.m. bedroom dresser |
For deeper systems after decluttering, these guides can help: How to build a sustainable home routine, Eco-friendly cleaning swaps, Minimalist living for beginners, How to reduce household waste, and Simple home organization systems that last.
Related TheLife Nexus Guides
Frequently asked questions
How long does it take to declutter a home one room at a time?
For most people, expect several weeks to a few months, not a weekend. A bathroom may take 30 to 60 minutes, while a kitchen or closet may need multiple sessions. The pace depends on home size, family size, clutter level, and how responsibly you handle donations and recycling.
What should I do if I get stuck making decisions?
Shrink the task. Work on one drawer or one shelf only. Use the function-plus-frequency rule, and skip sentimental items until later. If you still freeze, ask one question: would I notice this item was gone in the next month? That often clears the fog.
How can I donate unwanted household items responsibly?
Donate only clean, usable items that a person could reasonably use today. Check local charity guidelines before dropping off. Textiles, small appliances, and furniture all have different rules. For items that can’t be donated, use local recycling guidance or municipal drop-off options instead of wish-cycling.
What about kids’ items, paperwork, and electronics?
Treat them as mini-categories inside the room. Kids’ items need a size and use check. Paperwork should be sorted into action, archive, shred, or recycle. Electronics should never be tossed casually; look for e-waste programs through local government or trusted recycling directories.
Official and External Resources
Start smaller than you think, and keep going
If you’ve tried to declutter before and stalled, that does not mean you’re bad at it. It usually means the method asked too much at once. To declutter your home one room at a time is to work with your actual life: limited time, limited energy, and a desire not to create more waste while solving the problem.
The key ideas are simple: choose one contained space, set a timer, sort into four categories, remove outgoing items immediately, and stop before you’re wrecked. That’s how progress becomes maintainable. I’ve seen more lasting change come from six steady 45-minute sessions than from one dramatic Saturday purge that left the house in worse shape by Sunday night.
If you want more background reading, the EPA’s guidance on sustainable materials management is useful for disposal decisions, and local government waste rules should guide what can actually be recycled in your area. Thoughtful decluttering is slower. It’s also cleaner, calmer, and usually more durable.
Pick one small area today
Choose a bathroom drawer, one nightstand, or a single kitchen shelf. Set a 45-minute timer. Sort into keep, donate, recycle, and discard. Then stop. That one finished space is enough to restart momentum. The hardest part isn’t the sorting; it’s trusting that one drawer is enough for today.