Best Monitor Arms for Desk Setup Without Buyer Regret
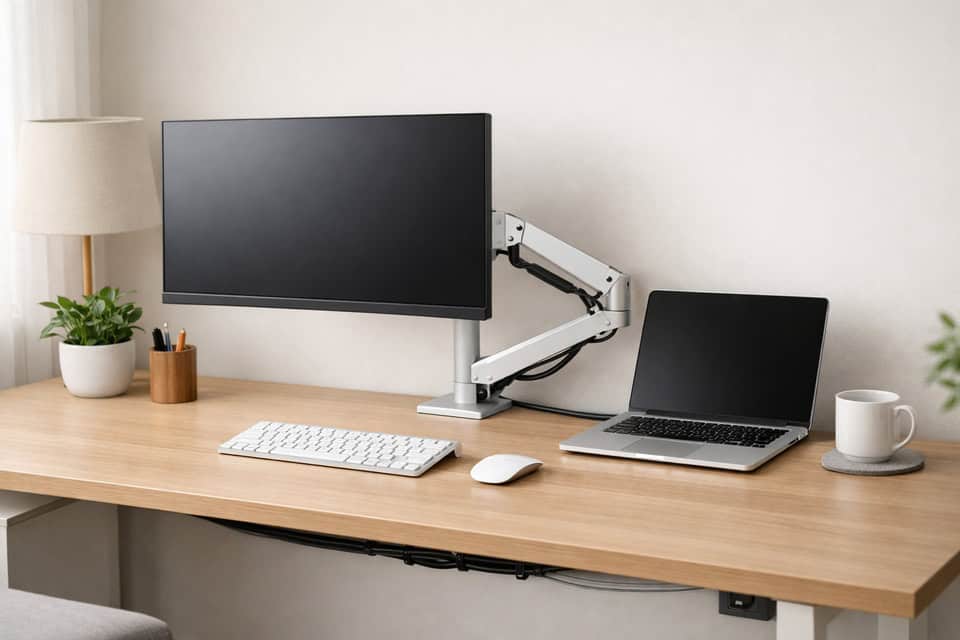
Best monitor arms for desk setup can turn a cramped, neck-straining workstation into something that actually feels comfortable to use for eight hours a day. If your screen sits too low, your desk feels crowded, or your cables look like they lost a fight, a good monitor arm isn’t a luxury. It’s one of the few upgrades that improves posture, frees surface space, and makes your setup easier to live with every day. It asks for a few minutes of setup, then pays back in inches of desk space and degrees of neck relief.
I say that after getting it wrong first. My first cheap arm looked fine in product photos, but it slowly sagged under a heavier 32-inch display, creaked when I adjusted it, and made the whole desk wobble every time I typed. After some trial and error, I learned that the right arm depends less on hype and more on your monitor weight, VESA pattern, desk material, and how much movement you actually need. The first impression was fine; the second month is where the cheap arm showed its real cost.
If you want the fast answer: a mid-range gas spring single arm is the best choice for most people, a sturdy dual setup works best for two similar monitors, and ultrawide screens need a true heavy duty monitor arm. The wrong arm wastes money. The right one makes your desk feel bigger on day one. You pay more upfront for the heavy-duty arm, but you skip the wobble and the regret of a second purchase.
Quick Summary
- Single monitor users: A gas spring single monitor arm in the $70 to $150 range usually gives the best mix of stability and adjustability.
- Dual monitor users: Choose a sturdy dual monitor arm only if both screens are similar in size and weight; separate arms often position better.
- Ultrawide owners: Do not cheap out. A heavy duty monitor arm is the safer call for 34-inch to 49-inch displays.
- Before buying: Check VESA support, actual monitor weight without the stand, desk thickness, and rear clearance.
- Mount choice matters: Clamp vs grommet monitor arm is not just preference; desk shape and material decide what works.
- Skip the purchase if your desk is flimsy particleboard, your monitor lacks VESA, or the arm’s weight rating barely matches your display.
What to Buy Fast If You Just Need a Clear Answer
If I had to choose quickly for most home office setups, I would buy a mid-range gas spring VESA monitor arm from a proven brand, not the cheapest listing with inflated weight claims. Based on testing and long-running recommendations from PCWorld, Wirecutter, and Tom’s Guide, the pattern is consistent: better arms cost more upfront, but they move smoothly, hold position, and last longer.
One monitor: mid-range gas spring arm
Two monitors: sturdy dual arm or two separate single arms
Ultrawide: premium heavy-duty arm only
Standing desk: arm with strong vertical range and solid clamp
Your buying checklist is simple: confirm VESA pattern (usually 75×75 or 100×100), check actual monitor weight, and measure desk thickness. If the arm’s max rating is close to your monitor’s weight, move up a tier. If your desk sits flush to the wall, pay attention to how far the arm needs to fold back. Getting the VESA pattern wrong means the arm won’t even mount—so double-check before you buy.
Do not buy a bargain dual arm for two heavy 27-inch or 32-inch monitors, and do not assume every monitor supports VESA out of the box. That one mistake catches a lot of people.

Why the Right Arm Changes Your Desk More Than You Expect
A monitor arm affects three things that matter every workday: ergonomics, usable desk space, and visual calm. Raising the screen to eye level reduces that subtle forward hunch many of us fall into. Pulling the monitor off its stock stand can free a surprising amount of space for notebooks, audio gear, or simply your forearms. By the second week, the extra forearm space feels like a desk upgrade you didn’t know you needed.
The long-term part matters too. I regret buying a budget arm for a heavier display — it worked for about two weeks, then started drooping a few millimeters every day. That sounds minor until you are constantly nudging the screen back up. The most expensive part of a bad monitor arm is not the price; it is the daily annoyance. That kind of slow sag is worse than a sudden failure because it tricks you into thinking it will stop.
Arms become especially useful on small desks, in minimal setups, and with a monitor arm for standing desk use where screen height needs to track your posture changes. If you are building around productivity, it also helps to think about the whole workspace, not just the mount. For related setup planning, see this home office setup guide and these minimal desk setup ideas.
A good arm is not exciting in the flashy sense. It just makes the desk feel easier to use, quieter visually, and less physically irritating. This visual tidiness is a core principle of many minimal desk setup ideas for remote work. It asks for nothing more than a few minutes to install and a desk edge thick enough to hold it.
The Specs That Actually Matter Before You Click Buy
| Arm Type | Typical Use | Common Weight Range | Price Range | Best Fit |
|---|---|---|---|---|
| Single arm | One 24-32 inch monitor | About 4.4 to 19.8 lb | $25-$150 | Most home offices |
| Dual arm | Two similar monitors | Often 13 to 20 lb per arm | $60-$200 | Productivity setups |
| Heavy-duty arm | 34-49 inch ultrawide | Often 20 to 40+ lb | $150-$400+ | Large premium displays |
| Clamp mount | Desk edge mounting | Depends on arm | Included on most arms | Fastest install |
| Grommet mount | Through desk hole | Depends on arm | Included on some arms | Cleaner, more secure feel |
Most desks support arm clamps within roughly 0.4 to 3.5 inches of thickness, but always verify the product specs. A thick butcher-block top and a hollow particleboard panel are not equal, even if they measure the same. The extra minute spent checking specs saves an hour of tweaking later.
How to Choose the Best Monitor Arms for Desk Setup
Start with monitor compatibility, not arm marketing
The first filter is VESA compatibility. Most monitors use 75x75mm or 100x100mm mounting holes. Some thin office displays hide them under a plate, and some consumer monitors skip VESA entirely. Check the back panel or manual before anything else. The holes you can’t see are the ones that matter most.
Then weigh the monitor correctly. Not the shipping weight. Not the weight with the stand attached if the stand comes off. I learned to check the manufacturer spec and then add a little margin for accessories like a light bar or webcam. Measure actual monitor weight before choosing an arm, or you are guessing with leverage.
Pick the arm type that matches your screen and desk behavior
Single monitor arm: Best for one main display and the cleanest desk look. Usually the easiest to position and the least frustrating.
Dual monitor arm: Good if both monitors are close in size and you want a shared mount. But if one screen is portrait, one is landscape, or the weights differ, two separate arms often give better flexibility.
Heavy duty monitor arm: Required for ultrawides, especially curved 34-inch, 38-inch, and 49-inch displays. These monitors create more torque than their size suggests.
Clamp vs grommet monitor arm: choose based on desk reality
Clamp mounts are easier and more common. They work well if your desk edge is accessible and strong. Grommet mounts can feel more planted and cleaner, especially if your desk already has a cable hole. If your desk sits against a wall or has a back lip, clamp installation can get awkward fast.
Shallow desks create another issue. On a 24-inch deep desk, some arms push the monitor too far forward before you can fold them back. I ran into this on a wall-adjacent setup where the elbow joints had nowhere to go. In that case, pole-style arms or compact-depth designs make more sense than long-reaching arms with dramatic extension.
Adjustability and cable management are where comfort lives
Look for enough height range, tilt, swivel, rotation, and extension to match how you actually work. If you sit and stand, vertical travel matters more than maximum reach. If you share the desk, smooth repositioning matters more than aesthetics.
Good monitor arm cable management is not just a plastic clip. Better arms route cables through channels that keep them from tugging during movement. Cheap arms often leave cables exposed and rubbing at the joints, which looks messy and can limit motion over time.

The Mistakes That Cause Wobble, Desk Damage, and Returns
First mistake: trusting max weight claims blindly. Some budget arms technically support the listed weight, but only at limited extension or with constant retightening. A monitor that sits at the top end of the rating may still sag in real use.
Second mistake: ignoring desk material. IKEA-style particleboard and honeycomb-fill tops can compress or crack under concentrated clamp pressure. That does not mean you can never use an arm, but it means you should reinforce the area and avoid overloading it.
Third mistake: forgetting rear clearance. Many clamp arms need a few inches behind the desk during installation or movement. If your desk is flush against a wall, the install can turn into a knuckle-scraping mess. I have done that awkward half-squat behind a desk trying to tighten a clamp by feel. Not fun.
Also plan for setup time. A simple arm might take 15 to 25 minutes. A dual monitor arm with cable routing and alignment can take 45 minutes or more, especially if you are balancing two screens evenly.
Which Type Is Worth Your Money for Your Setup
Budget monitor arms ($25-$60): Fine for lighter 24-inch or some 27-inch monitors if you rarely move the screen. Expect more plastic, rougher adjustments, and weaker cable management. Good for temporary setups, not my first choice for a daily work desk.
Mid-range arms ($70-$150): This is the sweet spot for most people. Better gas spring tuning, sturdier joints, easier installation, and less drift over time. If you want the best balance of price and daily comfort, this is where I would spend.
Premium arms ($150-$400+): Best for heavy screens, ultrawides, frequent repositioning, or long-term reliability. Ergotron-style options dominate here for a reason. The honest downside: premium arms are expensive, and for a basic 24-inch office monitor they can be overkill.
Best overall: Mid-range gas spring single arm for one 27-inch or 32-inch monitor
Best for dual monitors: Sturdy dual arm for two matching 24-inch or 27-inch displays, or two separate arms for mixed layouts
Best for ultrawide monitors: Premium heavy-duty arm with a comfortable weight margin
Best for standing desks: Arm with strong vertical travel and a secure clamp that resists desk movement
Who should buy budget: students, occasional users, or anyone mounting a light display and keeping it mostly fixed.
Who should buy mid-range: most remote workers, especially if the monitor is your main work tool.
Who should skip cheap dual arms: anyone running heavy 27-inch or 32-inch monitors, uneven monitor sizes, or a desk that already has some wobble. That combination usually ends in frustration.
Use This Simple Checklist Before You Buy
| Step | What to Check | Why It Matters |
|---|---|---|
| Check VESA + weight | 75×75 or 100×100, actual monitor weight | Prevents incompatible or sagging setups |
| Measure desk thickness | Top thickness, edge shape, desk material | Confirms clamp or grommet fit |
| Choose arm type | Single, dual, or heavy-duty | Matches monitor count and size |
| Pick mount style | Clamp vs grommet | Affects stability and installation ease |
| Set budget by monitor size | $25-$60, $70-$150, or $150+ | Larger monitors need better hardware |
| Confirm movement space | Rear clearance, wall distance, desk depth | Avoids awkward positioning after install |
If the checklist feels tedious, that is normal. It is still much easier than boxing up a bad arm and patching dents on your desk after the fact.
Frequently Asked Questions
Are monitor arms worth it for a normal home office?
Yes, especially if you work long hours at the same desk. A monitor arm improves screen height, clears desk space, and usually makes cable routing easier. For one light monitor, a mid-range arm often gives the best value. If you barely move your screen and your desk is large, the upgrade matters less.
Can a cheap arm damage a desk?
It can, especially on softer particleboard or hollow-core desks. Damage usually comes from concentrated clamp pressure, over-tightening, or using an arm near the limit of what the desk and mount can handle. A small wooden reinforcement plate under the clamp helps a lot.
Do all monitors support VESA mounts?
No. Many do, but not all. Some monitors need an adapter, and some consumer models skip VESA entirely. Check for 75x75mm or 100x100mm mounting holes before buying any arm. This is one of the most common buying mistakes.
Are monitor arms good for standing desks?
Yes, if the arm has enough vertical range and a strong mount. On a standing desk, the arm needs to stay stable while the desk moves and while you change posture. A better clamp and smoother height adjustment matter more here than on a fixed desk. If you use two screens, compare layouts with this dual monitor productivity guide.
Buy for Your Monitor and Desk, Not the Marketing
The right choice comes down to a few grounded decisions: your monitor’s actual weight, its VESA pattern, your desk’s material and thickness, and how much movement you really need. For most people, the best monitor arms for desk setup are not the cheapest and not the most expensive. They are the ones that fit the hardware you already own.
If your setup is simple, a solid single arm is usually enough. If you run two displays, be realistic about weight and alignment. If you own an ultrawide, buy the heavy-duty arm and move on. A stable monitor arm feels boring in the best possible way: it just works every day.
If you are refining the rest of your workspace too, pair this decision with desk layout and ergonomics planning so the arm actually improves the whole setup instead of becoming one isolated upgrade.
Ready to choose with less guesswork?
Match the arm to your monitor and desk first, then compare price. That one shift avoids most bad purchases.
For the rest of your workspace, browse home office setup ideas and minimal desk layout tips to build a desk that feels better to use every day.